Thursday, September 29, 2011

Beef Pastel


So I thought tonight would be another night I'd get to talk about some Filipino dish that has Spanish origins.  But try as I may, I couldn't find a single thing on Beef Pastel while searching the net.

Beef Pastel is like a Beef and Mushroom Pot Pie.  I did find a heck of a lot of articles on Filipino Pastel de Lengua while searching the net.  So naturally, I emailed mom to ask if there was some connection.  Low and behold, I discovered something that was glaringly obvious.... ha ha ha!  This is still so funny.

I guess my family just substituted regular stew meat for Ox tongue in the recipe for Pastel de Lengua.  So really what is supposed to be ox tongue meat pie, for us growing up was just a beef stew.  My mom never made the pie crust.  The funny thing is that I've had Pastel de Lengua quite a few times, but never noticed how....similar the taste was to Beef Pastel.  When I told Jon about this, he blamed the consistency of the lengua.  I guess that could throw you off.  Hah.  Well that gave me a little chuckle. 
Did any of that make sense to you guys? 

Well I don't think there's anything really Spanish about this dish or Pastel de Lengua except that the name of the dish is in Spanish.  That doesn't really mean too much since a while ago Spanish was one of the common languages spoken all over the Philippines.

Tonight's recipe is a bit of an anomaly in my repertoire because the recipe uses condensed soup!  I've definitely made it from scratch before, but that is a bit more time consuming and this tends to be a weeknight dish so I usually opt out of that.  Thank goodness someone finally made organic condensed cream of mushroom soup! 

Here's the recipe for the Beef Pastel.  If you want to get really authentic you can make it with boiled ox tongue and add green olives and chorizo de bilbao.  Yum.  I've got to ask my mom to make that sometime soon.  Oh yes, and put a pie crust on top of it!  I think Pastel means pie in Spanish or something, that's why the dish has that name.

Beef Pastel - Filipino Beef Stew (Pie)
(I think this is Lola's recipe too.)
Ingredients1lb        stew meat (Mom uses sirloin since she doesn't usually use the slow cooker)
1tbsp    butter or oil (grandma says use butter)
1/2 c    onions
1 can   condensed mushroom soup (if you're using organic it'll be a box of soup!)
2          potatoes
2         carrots
1c        peas
           mushrooms (as much as you like)
salt and pepper to taste

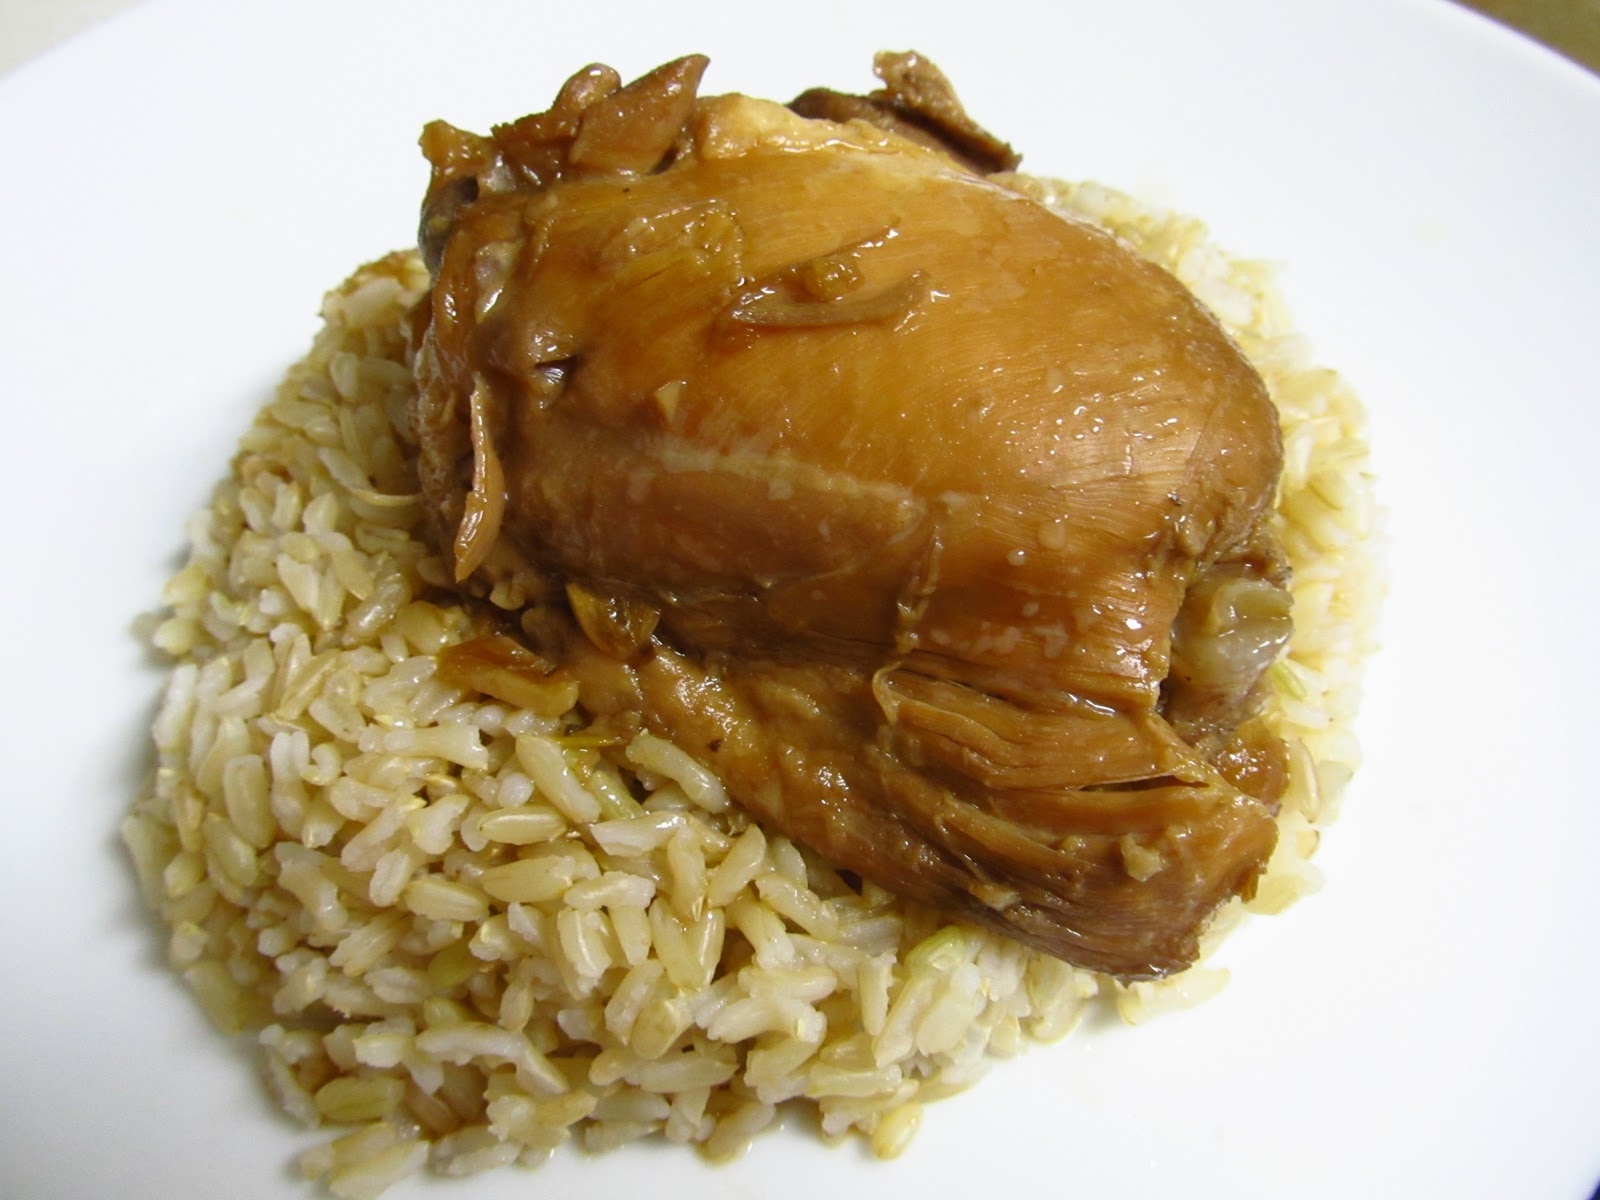
I doubled the recipe tonight with the hope that we would have enough leftovers for another night!


Method          
1.  Brown the beef lightly.  Drain meat and set aside. 

2.  Heat butter in pan, add onions and beef and saute until the beef is completely brown.  Add the can of mushroom soup (no water).  Simmer on low-medium heat until beef is almost
tender. 

3.  Add potatoes and carrots, cook until almost done. Add mushrooms and peas, cook until the peas are heated through and the potatoes and carrots are tender. 

4.  Season with  salt and pepper. 

I used the slow cooker tonight.  Not the best idea when you don't have much time.....

If you want, you can do it in the slow cooker to make the beef really, really tender.  Just add the vegetables (besides the onions) into the slow cooker an hour or two before you want it to finish. 

I was all wonky today and started late, yet for some reason I still decided to use the slow cooker.  Apparently I got mixed up and thought my slow cooker would act like a pressure cooker?  I don't know.  But after 2 hours in the slow cooker my meat was not as tender as I would have liked. 

Since Jon had a long day I decided to turn it on for another hour so it could cook more for when he got home.  I guess 1 more hour did the trick because he said that his beef was tender. 

So if you're going to use the slow cooker for this recipe, make sure that you have at least 3 hours for it to cook.
Ah yes, and if you cook it for a bit longer your sauce will reduce and be thicker too.  It's not supposed to look that thin.  Yikes, today was a kitchen disaster!

Give it a try!  My roomies in college seemed to like it well enough!

Oh yes, and today was the Feast of St. Michael the Archangel!!  Mikey's namesake day!  We unfortunately weren't able to make it to Mass because of Jon's long day and my inability to handle 2 loud toddlers at Mass solo.  I also tried to make a traditional French treat for the feast day, and while it tasted pretty good, it looked horrible and fell apart all over the place.  I'll spare you the ugly pictures.   If you have a pizzelle or gaufrette iron, you should try it.  If you have a regular waffle iron like me, steer clear!!  Next year I'll just make a goose like the English do.  Ha ha!


In the name of the Father, the Son, and the Holy Spirit.  Amen.
St. Michael the Archangel defend us in the day of battle
be our safeguard against the wickedness and snares of the devil
may God rebuke him we humbly pray
and do thou O prince of the heavenly host, by the power of God
cast into hell Satan and all the evil spirits
who prowl through the world seeking the ruin of souls. Amen.

Wednesday, September 28, 2011

Spanish Chicken and Rice or Arroz con Pollo

So if you don't know me and you haven't guessed from the blog yet, I'm of Filipino ethnicity.  My parents made the big trip over a few years before I was born, so I guess I'm considered a first generation Filipino.

Something that my mom never let me forget growing up was that a large part of our heritage is from Spain.  A lot of the food we had growing up was not only Filipino, but had a lot of spanish influences.  I don't think I really understood the big deal about our Spanish heritage until I went to Spain 6 years ago.

When I spent some time in Salamanca not only did I get very close to the town my ancestors must have come from (it was the same name as my maiden name!), but all the food seemed so familiar!  The flavors and dishes seemed like they were coming right out of my mom's kitchen.  It was so great!  At that point in my travels I had been in Europe for about a month and it was just so comforting to eat something that reminded me of home.  Who knew I could find a little bit of home in a country I'd never been in?

So anyways, this dish reminded me of that.  It's a bit funny, because my mom has never actually made this, but the first time I tried it, I was reminded a bit of my mom's paella.  She makes it at Christmas and Easter and it's probably my favorite Holiday (Holy Day) food.

This recipe comes from allrecipes.com and is a great weeknight meal idea. 
I've taken a few liberties with it like adding chorizo!  My mom puts chorizo in her paella, so when I saw that my local butcher shop makes their own fresh chorizo, I had to try it in this!  I also don't use pimentos, but substitute green peppers and pimentos with red peppers.

Tonight I had an unfortunate ingredient deficiency.  I didn't have any chicken stock, so I had to use water.  I don't think the dish was too bland though.  It was probably saved by the extra onion, garlic, and chorizo that I threw in there just in case!  When you make it, don't forget the chicken stock!

Arroz con Pollo
(adapted from HERE)

Ingredients
2lbs chicken thighs
1 chorizo sausage cut into chunks
1 onion diced
3 cloves of garlic minced
1 red bell pepper diced
1 cup peas
1  1/4cup rice
2 1/2 cups chicken stock
1tbsp butter
1tsp turmeric
1/4 tsp chili pdr
1/2 cup flour
1tsp garlic pdr
salt and pepper to taste


Method

1.  Mix together flour, garlic pdr, and some salt and pepper.

2.  Dredge chicken in flour mixture and brown in melted butter in a large pot or skillet.

3.  Once the chicken is nicely browned set it aside.

4.  Saute the garlic, onion, red pepper, and chorizo in the same pan (complete with leftover drippings and brown bits) that you browned the chicken in.  Saute until everything is softened.


I forgot to add the chorizo tonight with the veggies.  I didn't remember until I had added the rice.

5.  Add the rice, turn the temp down and cook for a couple minutes still stirring.

6.  Add the broth, turmeric, chili powder, and a bit more salt and pepper.  Bring up to a boil. 

I couldn't resist adding a dash of this to the dish.  I don't honestly know what, if anything, it added, I just know it's really popular in spanish cooking.  No it's not in the ingredients.

7.  Pour into a baking dish and top with chicken and peas.

Before I added the chicken and peas.


8. Cover and bake at 350 degrees F for 45 minutes to an hour until most of the liquid has been absorbed by the rice and the chicken is done.

Ready to go into the oven!

On my plate and ready to be devoured!  Yum!


In the name of the Father, the Son, and the Holy Spirit.  Amen.
Dear heavenly Father,
  thank you for every blessing and every trial you send us throughout the day.  Help us to constantly accept the grace you give us to live holy lives full of the fruits of your Spirit.  Amen.

Tuesday, September 27, 2011

Chicken Adobo (Filipino Adobo, not Mexican)

I think this is the easiest thing in my repertoire.  It's pretty much foolproof and Jon loves it which makes it a pretty common dish around here. 

Adobo always reminds me of being at home because we had it growing up a lot too.  Even now that I am all grown up and married to a white guy, I still have to eat it with a spoon and fork (the Filipino way!).  It feels weird to eat it with just a fork. 

In case you aren't familiar with the spoon and fork method, let me instruct you.  Your fork goes in your left hand (this is for right handed people, reverse if you're a south paw) and spoon goes in your right hand.  Gather up some adobo and rice into a nice little pile with your spoon on your plate, then push the little pile into your spoon with your fork and eat it out of the spoon!  See?  Now isn't that efficient?  Jon still refuses to try, even though I'm convinced he realises the sheer convenience and efficiency of the method. 

I think there's also some rule that you have to have equal portions of meat to rice on your spoon.  My parents would always look at me like I was adopted if I was just eating meat without rice on there.  My dad would just keep saying, "Don't you want more rice?  Here!  You don't have any more rice!"  It was like a dinner tragedy if one's plate was void of rice yet still had meat on it.  Ha ha!  Oh eating at home.  It's still like that.  Yeah, those of you who have eaten with my parents (esp. my dad) know what I"m talking about.

If you ever want to witness the quirkiness of my family's eating habits, I'll invite you to the next family bbq.  Just shoot me a comment! 

Back to the recipe. 

There are 2 schools of thought that I know of when it comes to adobo.  One being my mom's and the other being my sister's.  (As you can tell, I'm not so well read on the traditional adobo history or whatever).  Mom says no water, sister says as much water as soy sauce and vinegar.  Being the experimenter that I am, when I broke off on my own I used the in between rule:  half as much water as soy sauce and vinegar.  It seemed to work well for me.  Tonight I tried it my sister's way and Jon told me he prefers it stronger the way I usually make it.  I think I like it fine either way.  You can experiment on your own.  Here's the recipe the way I usually make it.


Adobo
(adapted from mom and sister...probably Lola's recipe)

Ingredients
2lbs chicken thighs or legs (this also works really well with pork ribs!!)
4 cloves of garlic minced
1/3 cup vinegar
1/3 cup soy sauce
2 1/2 tablespoons of water
1 tsp fresh ground black pepper
1 bay leaf


Method
1.  Place all ingredients into a pot and do not stir!!  Lola(grandma) says if you stir it then your adobo will be sour!  Make sure your pot isn't too big.  The liquid around your chicken should rise to at least halfway up the chicken.

2.  Heat up to boiling.  Once it has boiled Lola allows you to stir it.

3.  Cover and reduce heat to simmering.  Let it simmer at least 30 minutes or up to an hour.  The longer you let it simmer, the more flavor it has.  Just watch out, if you let it go too long it'll look like pulled pork.

4.  Serve over hot rice!  Don't forget the sauce!  That goes all over the rice!

Yes friends, it's that easy.  Not too many pictures tonight because, as you can see, the method is not all that complicated.  I think there are lots of variations on adobo in the Philippines, but this is how my family does it.  In some places they use coconut vinegar, in others they don't use soy sauce, in yet others chiles are added.  As far as I know, the adobo that we make is pretty standard.  I think it's the national dish of the Philippines or something right?  Super common.  Try it out!  I hope you like it!

In the name of the Father, the Son, and the Holy Spirit, Amen.
Dear God,
  thank you for little comforts that remind me of my childhood and home.  Whenever I start to get that nostalgia for home, help me to remember that my ultimate home is in heaven and help me strive to get to you always.  Amen.

Monday, September 26, 2011

It's not delivery, it's....Val's homemade pizza

We've been having a lot of pizza lately.  Unfortunately most of it has been pizza hut.  Tonight however, was not pizza hut and it was much, much, better.  It was likely much healthier for us too!


I've been making my own pizza since my mom gave me her old (like older than me) bread machine a few years ago.  It was a good starter machine.  I had fun exploring the world of dough and bread making with that old thing.   Since then I've been upgraded (thanks Mom in law!) to a shiny new cuisinart breadmaker.  It works like a dream and does a million different things.  Of course, a dough setting isn't that exciting, but it's always a plus when you get to throw ingredients into something and have perfect pizza dough pop out an hour and a half later.  I love that I don't have to watch it or transfer anything and there's a lot less to clean up.  Anyways, enough of my bread machine info-mercial.  Here's the recipe for a fantastic pizza.


Pizza Dough
(adapted from cuisinart bread maker recipe book)

1 1/2 cups warm water
1tsp honey
2tsp salt
2tbsp butter
2 1/2 c all purpose flour
1 1/2 c whole wheat flour
1tbsp Italian seasoning
2 1/4 tsp yeast

1.Throw that into a breadmaker on that dough setting. 

2.  At the end of the cycle punch down dough and shape into a flattened ball. 

Let it rest for 10 minutes before shaping into a pizza round. 

3.  Preheat your oven to 400 degrees.


(If you don't have a breadmaker mix together water, yeast and honey until frothy, then add all the ingredients and knead with a dough hook until smooth.  Place into an oiled bowl, cover and let rise in a warm area until doubled in bulk.  Then follow the rest of the instructions.)

**Oh yes, I forgot to mention.  This recipe makes a super thick crust.  If you don't like thick crust pizza's cut it in half, or just pinch off half and use the rest of the dough to make some foccacia or freeze it for next time!  I pinched off a bit and made a mini foccacia tonight.


Pizza sauce
(from my own wacky experiments)


Yikes, the flash makes it look almost neon.  I promise it's not radioactive!

1 small can of tomato paste
2 cloves of garlic minced
2 tsp oregano
2 tsp Italian seasoning
salt and pepper to taste

1.  Mix it all up then spread it all over your pizza dough!

Pizza Toppings!!
  • Cheese - we use the Trader Joe's "Quattro formaggio".  It's a blend of Parmesan, Asiago, Fontina and provolone cheese.  I know, it's non-traditional.  No mozzarella!!  Sometimes I go for the fresh mozzarella, that gives it a nice fresh/ more straight from Italy sort of feeling.
  • Meat - I usually go with chicken apple sausage, because we usually have that laying around in our freezer.  On the odd occasion I'll cook up some chicken thighs because Jon is weird and likes chicken on his pizza.  More often than not I'll make pizza on Friday and we'll go with veggie pizza.  Oh and if you've never tried smoked oysters on pizza, you haven't lived.  Try to find ones that aren't a product of China.  I always feel safer when canned things don't come from China.
  • Veggies! - tonight we had onions, spinach, red pepper, and mushrooms.  If I could only find organic artichokes in water, we'd have that.  Sometimes I'll throw on some organic black olives too.  Yum!
Once your pizza is assembled throw it into the oven and bake for 15 minutes at 400 degrees until the crust is golden brown and your cheese is melted.  If you don't have a pizza stone and you like your pizza more crunchy on the bottom take the pizza out of the pan and put it directly on the oven rack at around 10-12 minutes.  Enjoy!
Eat your heart out Papa whoever big pizza chain! 


In the name of the Father, the Son, and the Holy Spirit, Amen.
Dear Heavenly Father,
  Thank you for the gift of pizza.  Many youth groups and other Church activities center around this food item.  Please bless all those groups and help them grow fruit for you and our Church.  Bless the youth ministers and all the teenagers who have to swim against the current of our culture to follow you.  Amen.

Sunday, September 25, 2011

Drool.

This baby must have a sweet tooth, because I've been craving a lot of cheesecake, chocolate and cinnamon flavored things this pregnancy. 

I made this during nap time.
Brownies
I decreased the sugar by 1/4 cup, added some walnuts, and didn't frost them. 

This is a great recipe from scratch!!  I'm afraid of how quickly these may disappear.  Naptime has only been over for an hour and I've already had two.  Ha ha! 

I keep seeing great fall recipes involving pumpkin and cinnamon pop up everywhere.  Those are like my kryptonite.  I can't resist.  Well, I can, but darn that takes a lot of self control!!  Check this one out.

pull apart cinnamon sugar pumpkin bread.

or this

Pumpkin Cream Cheese Muffins


Gah.  Well, I was sad to see summer officially leave, but now that I remember how much I love the breeze and everything pumpkin, I'm pretty happy to welcome fall with open arms.

Saturday, September 24, 2011

Meatloaf

Last night was a pretty easy meal and I got the recipe here.  I used grated potatoes, not frozen hashbrowns.  It wasn't the most exciting thing in the world, but it's cheap and quick!  I guess I just don't get that excited about too many fish recipes, which is why I didn't blog last night.  I"ll have to get more adventurous on Fridays.

Tonight we had good old meatloaf!  I don't know if I've ever had meatloaf anywhere but my mom's house, so I don't know if this is how everyone makes it, or if it's some Filipino version of meatloaf.  Maybe someone can comment at the end of the post and let me know if it's the weirdest recipe they've ever seen, or it's pretty standard.  It comes from a book by Nora V. Daza who I guess was like the Rachel Ray of the Philippines back when my mom was learning how to cook.

Meatloaf is a funny sort of dish.  I think it's characteristically American right?  I don't remember hearing a lot about meatloaf or ever seeing it on a menu when I lived in Vancouver (Canada), but I don't think I talked about food much with anyone else than my family.  But there seem to be funny feelings surrounding the dish.  I'm not sure exactly what it is.  Maybe it's a love it or hate it sort of dish?  Or maybe a if you get it right then it's really good, but if you get it wrong it's really, really bad?  I don't know.  It's a mystery to me.  But in this house, we love meatloaf.  I like to think I get it really, really right.  Here's the recipe, so you can replicate the meatloaf and prove me wrong if you want.


Meat loaf de luxe
adapted from "Let's Cook with Nora" by Nora V. Daza

(The original recipe uses something called Liberty milk.  I have no idea what that is, but I used regular milk.  The original also uses bacon, but my mom usually flavors it with bbq sauce, so that's what I stuck with.)   

Ingredients
1c soft bread cut into pieces
1/2 c onion minced
1lb ground country sausage
1lb ground beef
1 egg beaten
3/4 milk
1/3c barbecue sauce (I mix ketchup, molasses, garlic powder, pepper, and dijon mustard.  Sometimes I add hot sauce if we want it spicy!)
salt and pepper to taste


Method
1.  Preheat oven to 350 degrees.  Mix together milk, egg, bread, onion, and salt and pepper.  I use my hands and do a lot of squishing.

2.  Add ground beef and country sausage and keep squishing until everything is well combined.

3.  Mix in 3 tbsp of bbq sauce and spread meat mixture into a loaf pan.

4.  Bake at 350 for 1.5 hours.  Drain off fat.  Serve with the remainder of the bbq sauce.

Sorry, no pics of the process tonight.  I should have enlisted Jon's help to take photos because the process involves a lot of squishing and messy hands.  Here's a pic of the finished product though!


In the name of the Father, the Son, and the Holy Spirit.  Amen.
Dear God,

thank you for family recipes and the stories that go along with them.  Help us to be thankful for the spiritual nourishment you give us in the Eucharist every time we sit down at our own family table for a hearty meal.  Amen.

Thursday, September 22, 2011

Wing Night with Sweet Potato Fries

So my meal planning white board for today said Lamb Tikka Masala.  As you can probably guess from the title of this post, I didn't make Lamb Tikka Masala.  There are two reasons for this:

1.  I was pretty much a blob on the couch yesterday and didn't get around to thawing the lamb to marinate overnight.
2.  I realized when I looked at the lamb this morning (thinking maybe, maybe it could work) that it's not really enough lamb for 2 people.  So I'll have to get more lamb for that recipe!

Tonight I went with one of my easy standards.  Wings. 

I made regular wings and hot wings.  Jon's a hot wing fan, but the kids don't really like spicy food and I wasn't really up for the spice today.  Actually, making two types of wings doesn't really add very much to the preparation, but you'll see that in the recipe/instructions below. 

Another favorite side dish for tonight were our sweet potato fries.  I call them fries, but they're baked, so I suppose you could call them roasted sweet potato sticks if you really like being technical.  One great thing about making these two things together is that with my oven and the baking trays I happen to use for these recipes I can get the chicken and the fries in there at the same time and they both turn out well!.

(Sidenote:  If you ever want to see a cute kid stuff his face as fast as possible, just come over here when I make sweet potato fries.  I wish I had taken a video of Michael eating these things.  They're his favorite!  It's almost like he's trying to play chubby bunny with them.  Too bad he can't actually say, "Chubby bunny."  We'll have to try to teach him that next time.)

The wing recipe isn't anything fancy and I didn't really get it from anywhere.  I suppose it accumulated in my brain after watching and reading about all the different ways to make breaded chicken.  I may have gleaned something from the back of the Frank's red hot bottle about how to spice up regular chicken wings though.  So here you have it.  Val's version for oven breaded wings.


Wings!

Ingredients
1.5 pounds wings and drummettes
1 cup buttermilk (or 1tbsp lemon juice + milk to make 1 cup)
1 cup ground oats (magic bullet is great for this!)
1 cup oat bran cereal (Jon's breakfast pulverized by magic bullet)
1tbsp onion powder
2tsp garlic powder
salt and pepper to taste
3tbsp butter
3 tbsp hot sauce (we like Frank's)

Method
1.  In a medium bown mix together oats, cereal, onion powder, garlic powder, salt and pepper.

2.  In another bowl combine wings and buttermilk.  Make sure the wings are well coated.

3.  Take each wing and dredge it in the oat mixture and lay on a baking sheet covered with foil.

4.  Bake wings in a 400 degree oven for 25 minutes.


I know, I should have used a larger pan tonight.  I underestimated the size of the wings.

5.  Melt the 3tbsp butter and after the wings have baked for 25 minutes drizzle them with 2tbsp butter.

6.  For hot wings mix 1tbsp melted butter and the hot sauce, stir well, then drizzle over wings. 

7.  Return wings to the oven for another 5 minutes.

These are how Jon's hot wings turned out.  I neglected to get a pretty picture of them on his plate!

Sweet Potato Fries (you can use yams too!)

Ingredients
2 large sweet potatoes cut into sticks (shaped like fries?  Ha ha!)
2tbsp oil
salt and pepper to taste

Method
1.  Toss sweet potatoes in oil and season with salt and pepper.

2.  Put the sweet potatoes in the oven with your chicken on a separate rack!  Try to make sure they're on opposite sides of the oven so the sweet potatoes aren't covered.  Or just bake at 400 for 25 minutes.


If you're baking your fries and the chicken wings at the same time make sure to check on the fries when your chicken wings are ready for their butter or hot sauce.  I wasn't so careful tonight and we ended up with a few blackened casualties.  It also helps if you cut your sweet potatoes in uniform shapes so that they all cook evenly.  I (as I think I have told you before) am not an expert at cutting things yet.  Good thing Jon likes the taste of burnt things.  How lucky am I?


In the name of the Father, the Son, and the Holy Spirit, Amen.
Dear Heavenly Father,
  thank you for the blessing of our children.  They bring such joy to our home and give us so many opportunities to grow in holiness.  Help us to see those opportunities and give us the grace to make use of them.  Amen.

UIOGD

Tuesday, September 20, 2011

Roast Beef in a crock pot....is that pot roast?

When Jon and I got married I'd never made a roast beef or a pot roast.  I'm still not sure if this qualifies as either, but whatever it is, it is easy and it tastes great! 

This roast appeals to me for 2 reasons. 
1.  I can make it in the crock pot!
2.  It makes fantastic onion gravy.

Making things in the crock pot on hot days is always a great way to go because the crock pot doesn't heat up the whole kitchen like your oven does.  Miraculously, summer decided to come back for a day here in the northwest, so it was actually hot.  Hopefully it sticks around!

Roast Beef/Pot roast? with onion gravy
adapted from here

1lb chuck roast
2 onions sliced
3 cloves of garlic minced
1 bay leaf
1tbsp red wine vinegar
2tbsp flour
2tsp rosemary
2tsp garlic pdr
salt and pepper to taste


1.  Sprinkle your chuck roast with salt, pepper, garlic powder, and rosemary all over and brown on all sides in a hot skillet.  Set aside.

2.  Saute onions in the same skillet until the onions are just slightly wilted. 

3.  Toss onions and garlic in crock pot.  Lay roast on top of onions and add vinegar, and bay leaf.

4.  Set crock pot for at least 3 hours, preferably 6. 

5.  When the crock pot is finished, take out the onions and puree them up with a blender (I use an immersion blender in a metal cup). 

6.  Add 2tbsp flour and return to crock pot.  Simmer on high for a minute or two until the gravy thickens.
I suppose you could also do this in a pan, but I'm all about less dishes, so I just threw it back into the crock pot.  If the gravy is too thick for your taste, add a bit of water.

The gravy is light colored because of the onions. 


7.  Slice your roast and serve with gravy!  Tonight we had it with mashed potatoes and green beans.  Classic.  Mmmmmm.

Mikey isn't a big fan of beef, but he ate a sizeable chunk of this roast tonight, along with a good pile of mashed potatoes.

In the name of the Father, the Son, and the Holy Spirit, Amen.
Dear God, thank you for wonderful inventions which give us more time to focus on family and You.  Amid the noise and busy day help us to remember to put you first and always keep heaven as our goal.  Amen.

 UIOGD

Monday, September 19, 2011

Chicken pitas, and tzatziki sauce

I know you can't see the chicken, but it's under the veggies and tzatziki sauce!

Today was a fly by the seat of my pants kind of day.  I hadn't meal planned for this week, but thankfully I knew I had to go to the store for meat anyways.  The kiddos and I made the trek out to Trader Joe's today and picked up some organic free range chicken.  Unfortunately there was a bit of a mishap when I started to prepare it.

I opened the package to get ready to marinate the chicken and something smelled really off.  The raw chicken smelled like rotten eggs.  Lame.  The sell by date isn't even until the end of the week.  I wrote Trader Joe's an email about it.  Even though the thing only cost me $3 ($1.99 a pound for organic drumsticks!) I was still pretty irritated about having to throw away a whole package of chicken.  I don't know if they'll refund me or anything, but I wasn't really up for putting the rotten chicken back into the plastic packaging and making the 20 minute drive back out there to try and return it.  Ugh, smelling rotten chicken in your first trimester is not a fun ordeal. 

It took a good 40 mintues to muster up the courage to open up another package of chicken I bought from them today.  I even took a good sniff just to make sure I wasn't going to poison someone with it.  Ah, that's what raw chicken should smell like.   Nothing!!  At least I think that's what it's supposed to smell like.  In any case I"m just glad it didn't smell like rotten eggs, or pulp mills, or sulfur.  Blech. 

So now that I've thoroughly grossed you out, let me tell you more about the pleasant chicken souvlaki/pita dinner we had tonight! 
It looks like a long process, but it didn't feel like very much work.  Here's how it went.

Chicken Pita Souvlaki filling
(sort of adapted from Here)  I just used the chicken marinade recipe loosely.  I pretty much disregarded everything else

1lb meaty chicken pieces
3tbsp lemon juice
2tbsp balsamic vinegar
2tsbp oil (sunflower as usual)
1tbsp dried oregano
salt and pepper to taste

1.  Place everything in a ziplock bag and let marinate in the fridge for at least an hour.  The longer the better, up to a day.


While the Chicken is marinating start your ......

Pita bread!
Here's the recipe for that.  Sorry, I forgot to take shots of the pita bread process.  It's basically a bread maker deal, so I wasn't all that involved except for the rolling out circles and the baking in the oven part.

This is the easiest pita bread recipe I've tried so far.  I swapped out 1/3 of the all purpose flour for whole wheat flour and the pitas turned out wonderfully.  Definitely put them in a paper bag and seal it (I used a chip clip) until they cool, otherwise they'll be rock hard and crack easily.  They didn't crack and they held up to the tzatziki sauce very well. 

Speaking of tzatziki sauce, while the bread is doing it's thing in the machine get your tzatziki sauce ready!


Tzatziki sauce
(adapted from allrecipes, but I don't know where anymore it's been so long since I accquired the recipe)
Tonight I made half a recipe.

1 cup plain yogurt
2 tablespoons extra virgin olive oil
1 tablespoon lemon juice
1/2 tsp salt
1/2 tsp black pepper
1 tablespoon dill
3 cloves minced garlic
1 grated cucumber (some people like to let it drain on paper towels to get the moisture out, I've made this recipe without doing that and it turned out fine).  I use 2 persian cucumbers or 1 regular.  If it were an english cucumber I'd probably only use half.

Mix it all together and let sit in the fridge for 30 minutes at least before eating.  The flavors meld together really well if you let it sit for a while before using it.

Okay, so after your Tzatziki sauce is ready, bake your bread in your 500 degree oven.  It took me 2 batches (10 minutes total).  Turn your oven down to 400 degrees and bake your chicken for 30 minutes until the skin is dark and crispy and the juices run clear.


While your pitas are cooling and your chicken is cooking chop up....

1 large tomato (I happened to have an heirloom tomato today, yum!)
2 small cucumbers
romaine lettuce (I only had spinach today so that's what we used!)

When your chicken is done, shred it up and stuff your pitas with your chopped veggies, chicken and tzatziki sauce and voila!  A great dinner.

Tonight I didn't have any kalamata olives or red onion, but I would have definitely added those if I had them.  If I weren't pregnant I would also have added feta cheese.  Yum.  Don't be frightened, it's really not that difficult at all.  There are just a few steps to it!

It's not the prettiest picture, sorry I was in a rush!


In the name of the Father, the Son , and the Holy Spirit, Amen.
Dear Jesus, whenever I make some sort of flat bread I'm reminded of you, the last supper, and the Eucharist.  We are so thankful that you humbled yourself and come to us in the form of food and drink.  Thank you for this incredible and amazing gift.  Help us to always be in awe of the Blessed Sacrament.  Amen.

Sunday, September 18, 2011

Beef and Spinach burritos

I don't think this is really Mexican at all, so I apologize to my Mexican readers.  This is just another American filling in a tortilla.  Oh, but it is good.  And it is soooooo easy!  At the moment, easy is a really good thing. 
(I think this happens to be pretty good pregnancy food too, because there's a ton of protein, iron and folic acid in it.  Yay spinach!) 

But really, the only thing easier than this is probably calling for take out, which we did yesterday because I was too much of a blob on the couch and didn't make it to Trader Joe's to get the special cheese I needed to make that pizza I was planning on making.  Oh well.  C'est la vie.

My mom has been making these burritos since I was a kid.  When I asked her where she got the recipe (thinking there was some great story to it, since there usually is) she simply reponded, "I think I clipped it out of a magazine."  Huh.  Sometime you just strike gold when you least expect it.
Unforunately she couldn't find the magazine clipping, so I had to go hunting on the internet for the recipe and I found it!

Here!

The person on the blog also got it from a Beef ad in a magazine and after showing the recipe to mom, she confirmed that this was in fact the one she used over and over.

I made one adjustment.  I didn't use frozen spinach, but used fresh instead because I hate waiting for things to thaw and drain.  I will avoid it at all costs.  I just picked up a container of baby spinach and did a quick rough chop on about 2/3 of the container.


So all you have to do is brown the beef.  Season it with cumin and chili powder.


Add the chopped spinach.


Add the salsa.

Add the cheese and you're done!  Make sure to take it off the heat, so you don't burn the cheese.  The hot beef and spinach will melt the cheese quickly enough.

Then wrap it in a handy dandy homemade tortilla (Recipe HERE!  I used butter not shortening!!) and enjoy.

Yes I made my own tortillas.  That was not so easy, because you have to roll them all out.  I'm not such an expert at rolling and half of the tortillas turned out square!  Ha ha ha!  Jon had a good laugh watching me try to roll those out.  Once again, I made them because it's hard to find organic tortillas made without soybean oil.

I apologize.  This preggo was too darned hungry to take a picture of the wrapped up burrito.  It went straight into my mouth without a picture.  You'll just have to make it yourself to see what it looks like as a finished product!
In the name of the Father, the Son, and the Holy Spirit, Amen.
Dear God,  We thank you for this food which graced our table today and the ease of preparation involved.   Thank you for the gift of this new life coming to join our family.  Thank you God for my husband who is willing to pick up take out.  Amen.