Showing posts with label chinese. Show all posts

Tuesday, October 25, 2011

Siopao (Filipino steamed pork buns)

So I think these are known in Vietnamese cooking as Hum Bao(?).  I think people around this area might be more familiar with them by that name, but if you're Filipino you'll know them as siopao (pronounced See-Oh-Pow)

I've been having these things for as long as I can remember.  I don't really remember my mom making them from scratch, maybe once?  I think I might have already been away at college at that point.  Whenever we bought them we would drive down to China town (usually after picking my mom up from work down town) and pick up a box of these and probably an egg tart for me.  We would always go to New Town Bakery.  Sometimes we would stay and eat and dad would have a bowl of soup along with his siopao, but most of the time we just came for the ever beloved steamed buns.  These are not actually my favorite type of steamed buns, I always loved the chinese sausage filled buns, but I can't seem to find chinese sausage that doesn't have either msg or food dyes in it, so these will have to do until some healthy food company works on a natural chinese sausage.

When I moved down south to the states I only ever got siopao when my parents would bring some, or if I was courageous enough to try some frozen variety from the asian section of the grocery store (ick!).  I'm quite picky with my chinese restaurants and I've only found one that meets Vancouver (BC) standards around here so far. 

At some point, after reading a few recipes on the internet and in the Filipino cookbooks my mom got me, I started trying to make my own.  I think I've got it down.  I've made them a few times now and once you get the hang of things you really get a sense of the time it takes and how to do things most efficiently. 

I don't think Jon had ever tried siopao until my mom got some from New Town Bakery while we were dating.  He was hooked instantly.  He said something about them being fun to eat and I think he felt like an anime character chomping into those big fluffy white steamed buns.  Ha ha!  He asks me to make these a lot.  He doesn't usually eat dinner faster than me (or eat more than me) but tonight he was finished with a big satisfied look on his face much faster than I was.  Michael even attacked his.  I think it's safe to say that these are a family favorite for
a) the fluffy white bun part
b) the flavorful pork inside
c) because they're fun to eat.

So try it out.  If you have a bread maker or are at ease with dough you won't have any trouble with this recipe.  If you don't have a bread maker or are freaked out by dough, trust me, these are worth facing your fears.

Siopao (pork filled steamed buns)
(adapted from Let's Cook with Nora by Nora V. Daza)

So I'm going to give the instructions in 2 parts, but you'll want to start making the dough as soon as you get the pork simmering on the stove.

A.  Pork Asado (filling)

Ingredients
1lb pork country ribs cut into cubes
3/4c (you might need some extra) chicken stock
1/3c soy sauce
1/3c brown sugar
1/2c onion diced
2 cloves of garlic minced

Method
1.  In a saucepan combine all the ingredients except the pork and heat on low for a few minutes until everything combines nicely.

I have no idea why blogger made this picture portrait (it's landscape on my computer) but I can't fix it!


2.  Put the pork into the pan and raise the temp up to med-high.  Bring it to a boil, then lower the temp and let it simmer until the meat is tender.  I let mine go for almost two hours.  Watch out!  If your liquid gets low before your pork is tender add more liquid.  I probably added another 3/4 cup of chicken stock.  When the pork separates like pulled pork then it's done.  When it's done the pork should be tender and the liquid should be almost completely evaporated.  The sauce should be thick and dark.  If you want to prepare this ahead of time I've had it work well in the slow cooker before, just make sure you have it in there for a long time (like 5 or 6 hours at least). 


Same problem with this shot.

3.  Take the pork off the heat, shred all the pork and let it cool.  Mine was so tender after 2 hours I just had to stir it hard with a wooden spoon to get it all shredded nicely.  Set it aside.


B.  Siopao Dough
*scroll to the bottom for instructions without a bread maker

Ingredients
1 1/2c warm water
4tbsp sugar
1/4c coconut oil (the original recipe says lard) + about another 1/4c for kneading
4 1/2c all purpose flour
3 tsp yeast

Method

1.  Put all ingredients in the order listed into the pan of your bread maker and set on dough setting.

2.  When the dough finishes punch it down and knead it for a minute or two on an oiled surface (use more coconut oil).  Separate the dough into 8-12 balls depending on the size you you want.  I should probably make mine smaller because they get so puffy that they stick together in my steamer.  If you don't want that to happen try making 12 smaller siopao instead of my 8 gigantic ones.


C.  Filling and cooking
Materials
parchment paper cut into 3x3 inch squares
steamer

1.  Flatten each ball of dough in your (well oiled) hands and put about 2 rounded tablespoons of pork asado filling in the center.  Gently pull the dough around the meat and pinch the dough together at the top.  Lay the ball on a piece of parchment paper seam side down.  Repeat with the rest of the dough and meat filling.

2.  Steam the buns for 15 minutes.  I don't have a huge steamer (probably like most of you) and I had to steam them in 3 batches.

Serve hot! 

I wish I had gotten a shot of it after I bit into it.  Or better yet of Jon sinking his teeth in.

So again, don't be daunted, it's really easy once you get the hang of it.  Just get the pork simmering, start the dough, then by the time the dough is done the pork should be cool and ready to go.


In the name of the Father, the Son, and the Holy Spirit, Amen.
Dear God,
  Thank you for my husband and my children.  They help me become better every day.  Thank you for the love and laughter in our family, we are truly blessed.  Amen.

-------------------------------------------------------------------

*Non bread maker dough instructions from "Let's cook with Nora".
1.  Dissolve yeast in water.  then add sugar and 2 1/2c flour to make a soft sponge, beat thoroughly with a wooden spoon.

2.  Let dough rise in a warm place covered for 30-40 minutes.

3.  After rising add remaining flour and 1/4c oil and mix well.  Turn onto a greased board and knead until smooth.

4.  Divide dough into 8-12 balls.  Flatten each ball and fill with asado.  Pinch the edges together and seal, lay seam side down on parchment paper.

5.  Let dough rise for 20 minutes before steaming.

Friday, October 14, 2011

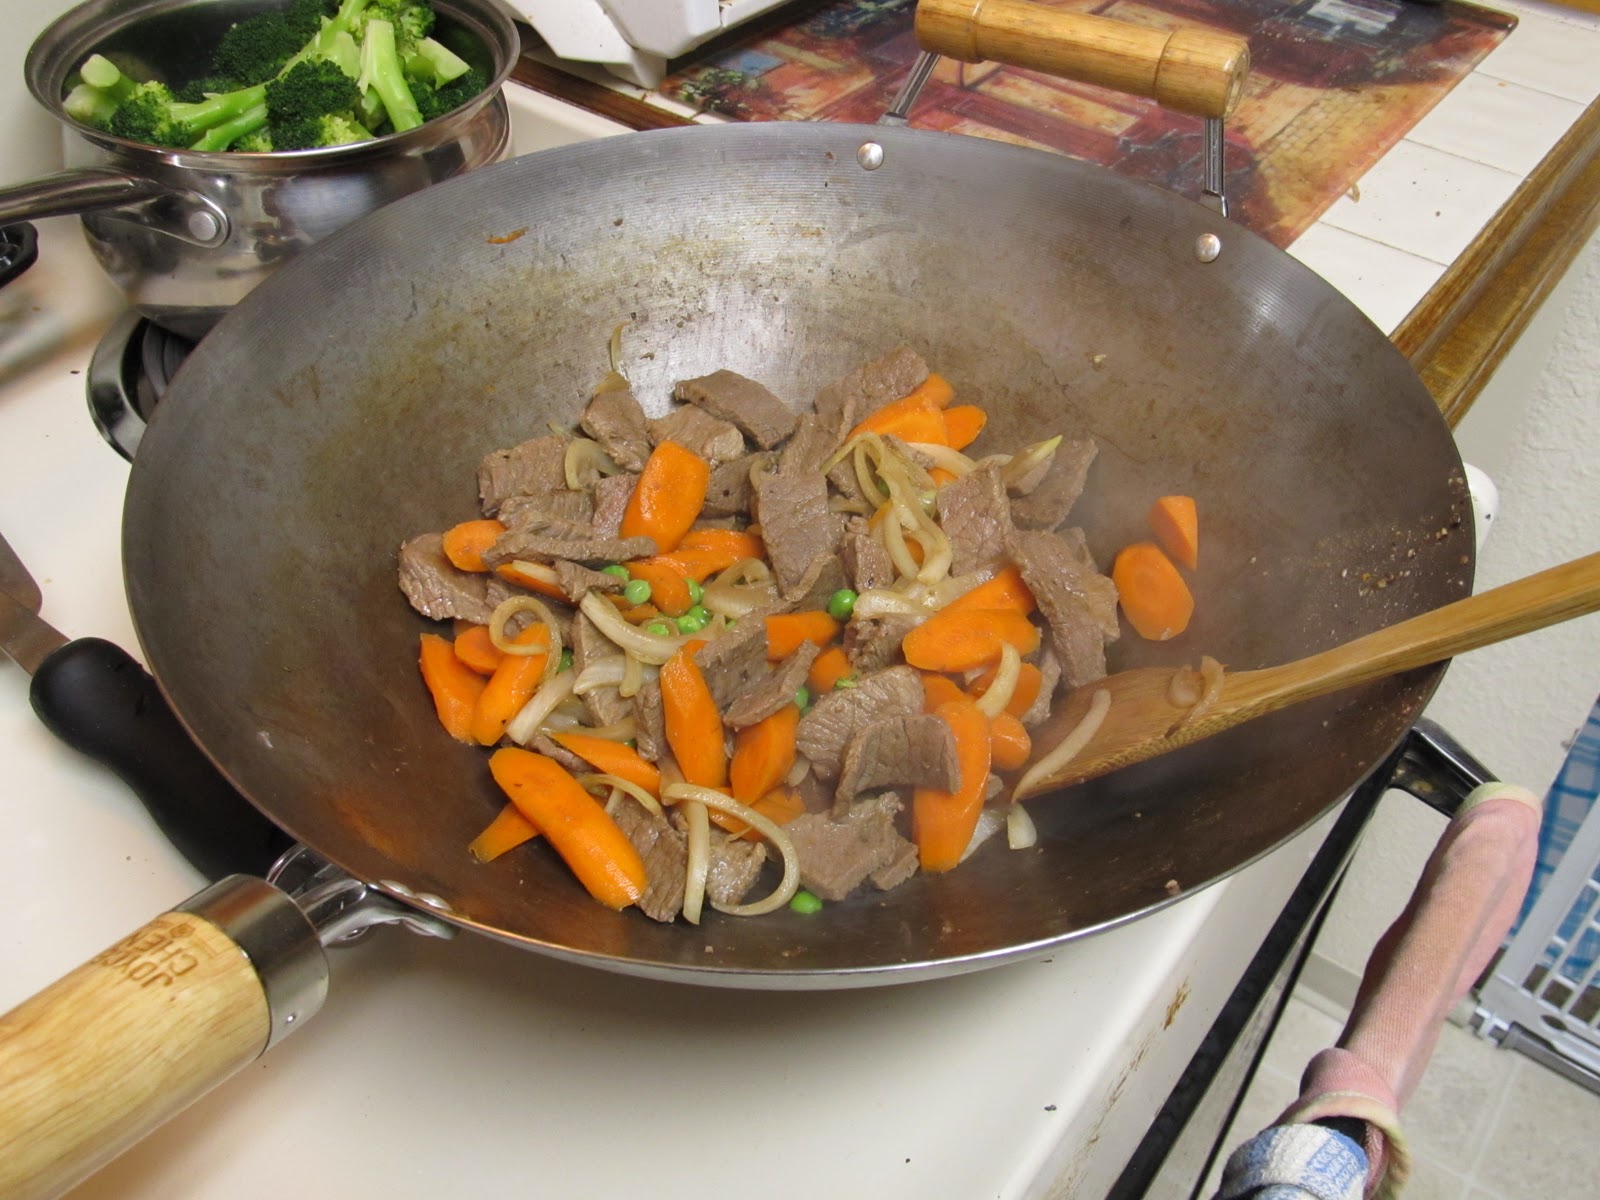
Beef and Broccoli

I can't make or eat this dish without thinking of my friend and old roomie Melena.  I think one night my parents came to visit our apartment during our junior year of college and my mom had made some of this, or brought it from home for me and the roomies.  Melena fell in love instantly and whenever my parents were talking about visiting after that she would automatically burst out loudly, "Broccoli Beef!!" in sort of a TV announcer voice.  I don't really know where this response came from, but she liked it that much!  Ha ha!

 I wouldn't say that this dish is knock your socks off amazing, but it's pretty good.  It's one of those lick your plate clean, feel totally satisfied, get all your veggies in kind of dish. 

I think this dish is a pretty common standard on most Chinese restaurant menus, but it tastes so much better and REAL when it's homemade.  It comes together pretty quickly with a little bit of prep, so it makes a great weeknight meal.  Try it out!

I tried to blog about it last night when I made it, but when my mom photocopied the recipe out of her book for me it didn't have the book info with it, so now that I'm hanging out at mom's house I can blog about it!

Beef and Vegetable Stir-fry
adapted from Better Homes and Gardens Oriental Cookbook

Ingredients
1lb beef top round steak (or any beef for stir-fry) sliced thinly (*Tip: partially freeze beef before slicing to make thin slicing easier)
1 1/2 cups broccoli cut into pieces
3 medium carrots bias sliced
2tsp cornstarch
1tsp salt
1/2 tsp sugar
2tbsp sherry
1/4c soy sauce
2 tbsp sunflower oil or other oil that can handle high heat
1 medium onion sliced
1c frozen peas


Method
1.  Blanch broccoli and carrots in boiling water for a minute then drain.

2.  Mix cornstarch, salt, sugar, soy sauce and sherry and set aside.

3.  Preheat a wok to high heat and quickly stir fry broccoli, onion, and carrots and set aside.

4.  Add beef to wok and stir fry for a few minutes until everything is browned.  You may have to work in batches.

5.  Add all the veggies back into the wok with the beef.   Stir the liquid mixture then add it to the wok and turn down the heat to low/medium.  Cook and stir until the sauce is thick and bubbly and all the meat and veggies are coated with sauce.

Serve on top of rice or noodles!


Here you go Melena!  Now you can make the magical Broccoli Beef whenever you please!!


In the name of the Father, the Son, and the Holy Spirit, Amen.
Dear God,
thank you for great friends and hilarious memories from college.  Please bless all my friends wherever they are and in the dreams they are pursuing.  Amen.

Wednesday, October 12, 2011

Mongolian Pork

I think there were flames coming out of my mouth at dinner tonight.  I made Mongolian Pork.  The recipe is actually called Sweet, Spicy, Sticky Chicken and it's from allrecipes.com but I decided to try it with pork tonight.  Aside from chicken, the original recipe also calls for fresh ginger and garlic which is also nice, but tonight I didn't feel like having chunks of ginger and garlic in the sauce so I went with the powders.

I'm calling it Mongolian Pork because I think the sauce tastes a heck of a lot like the "Mongolian" sauce that our favorite Mongolian Grill restaurant uses.  I use the quotations because I have no idea what Mongolian food is actually like and I don't really trust your average Mongolian grill chain restaurant with authentic ethnic food.  Can you blame me?  Does anyone know what real Mongolian food is like?

So if you've never been to a Mongolian Grill and have no idea what the sauce might taste like, I suppose the original name for the dish might be more descriptive, though more cumbersome to say, unless you love alliterations. 

Mongolian Pork (Or Chicken or whatever meat you choose)
adapted from here

Ingredients
  • 1 tbsp brown sugar

  • 2 tbsps honey

  • 1/4 c soy sauce

  • 2 tsp ginger powder

  • 2 tsp garlic powder

  • 2 tbsp sriracha sauce (though I might use 1 tbsp next time so that I don't have to feel pain during dinner)

  • 1/3 c + 1tsp cornstarch

  • salt and pepper to taste

  • 1lb boneless pork pieces cut into cubes

  • 2 tbsp oil


  • Method
    1.  Mix together brown sugar, honey, soy sauce, ginger powder, garlic powder, sriracha sauce (I imagine any hot sauce will do just fine), and 1 tsp cornstarch (use non gmo!).  Set aside.

    2.  Heat the oil in a stainless steel skillet or pot, preferably a large one.  I'd say keep the heat between low and medium.  If you have a good stainless steel skillet you won't need it any hotter.  If your pan is too hot everything will stick and burn.  If you try to use nonstick I don't think your pork will brown and crisp as nicely.

    3.  Dredge the pork in the remaining cornstarch until it's completely white.

    4.  Fry the pork in the oil until all sides are light brown and crispy and the pork is completely done.  If there's a lot of oil left in the pan, drain it out.

    5.  Lower your heat and add the liquid mixture from step 1 to your fried pork.  Mix everything together and let it bubble a bit until the mixture thickens and all the pork is coated. 

    That's it!

    Top with nuts if you like and serve over hot rice or noodles.


    I would imagine that this recipe would work well if you added some sliced veggies in with the pork or if you decided to stir fry everything instead.  I do the cornstarch dredging because I like the crispy texture underneath the sauce.  The texture is sort of like a Chinese sweet and sour pork.  Though I may try doing the stir fry thing in a wok next time because it would be healthier. 

    Try it out!  If you're a fan of spicy Chinese food I think you'll like this.


    In the name of the Father, the Son, and the Holy Spirit, Amen.
    Dear God,
      thank you for a healthy 14 week old baby in utero.  Please keep him or her safe until it's time to come out and please protect all the babies in their mother's wombs all throughout the world.  Please bless the efforts of everyone participating in 40 days for life.  Amen.